
Introduction
Who wouldn’t love the allure of rock candy? Those colorful, sparkly crystals of sweetness have captivated people for centuries. But did you know that you can grow your own rock candy at home? Not only is it a fun and delicious project, but it’s also a great way to explore some basic chemistry concepts. In this blog post, we’ll walk you through the process of growing rock candy and dive into the science behind this sweet treat.
What is Rock Candy?
Rock candy is a type of confectionery that is made by crystallizing sugar in water. It’s also known as “rock sugar” or “candy crystals.” Unlike other candies that are chewy or soft, rock candy is hard and glass-like, with a smooth, glossy surface. It’s often colored and flavored, making it a popular treat at parties, fairs, and even in some upscale desserts.
The Science Behind Rock Candy
Growing rock candy is a classic chemistry experiment that demonstrates the process of crystallization. Crystallization is the process by which molecules in a solution arrange themselves into a repeating pattern, forming a crystal lattice. This process occurs when a solution is supersaturated, meaning it contains more dissolved substance than it can hold under normal conditions.
To grow rock candy, you need to create a supersaturated solution of sugar in water. This is done by heating the water to dissolve as much sugar as possible. Once the solution cools, it becomes supersaturated, and the sugar molecules begin to bond together, forming crystals. By providing a surface for these crystals to form on, like a string or a stick, you can watch the crystals grow over time.
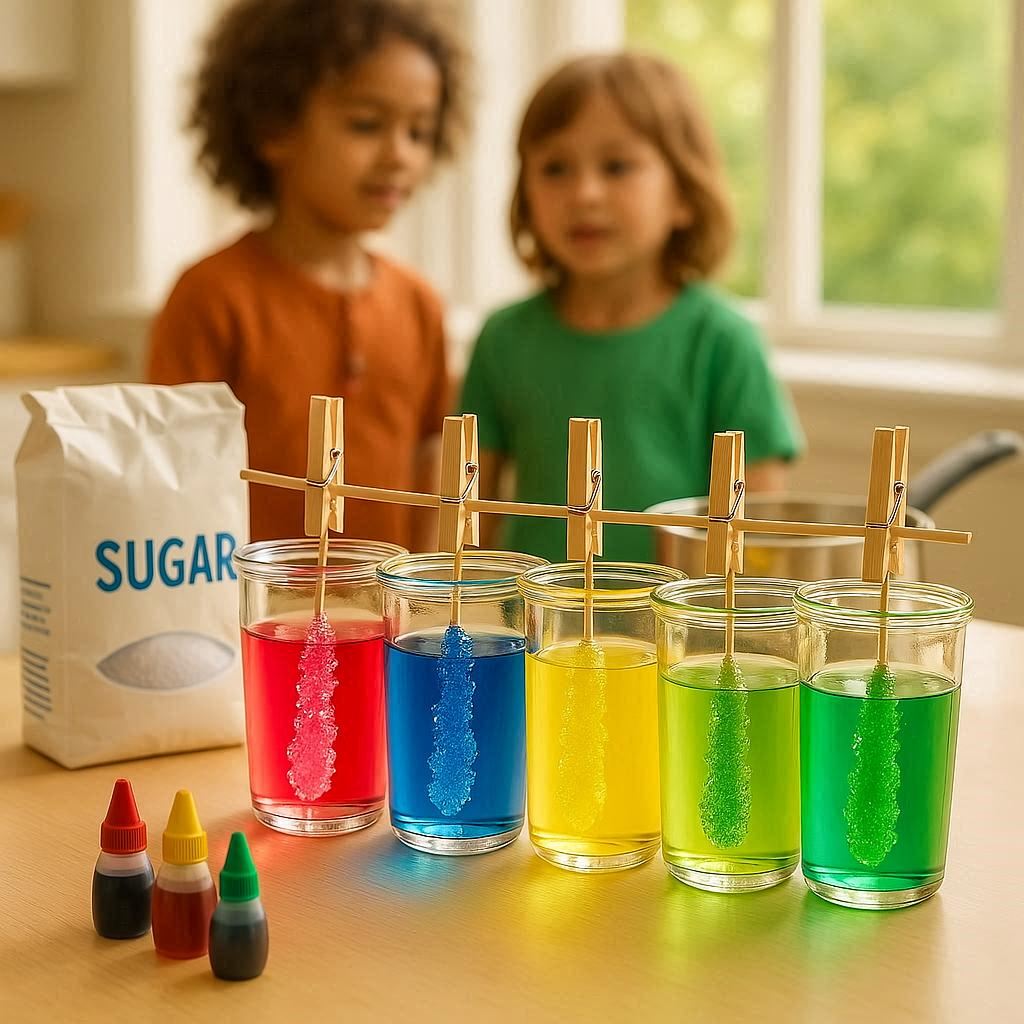
Materials Needed
To grow your own rock candy, you’ll need the following materials:
- Granulated sugar
- Water
- A clean glass jar or container with a lid
- A wooden skewer, string, or stick
- Food coloring (optional)
- Flavorings (optional)
- A pencil or chopstick
- A paper clip (optional)
Step-by-Step Guide to Growing Rock Candy
Step 1: Prepare the Supersaturated Solution
Start by creating a supersaturated sugar solution. In a small saucepan, combine 2 cups of water and 4 cups of granulated sugar. Heat the mixture over medium heat, stirring until the sugar dissolves. Continue heating until the solution reaches 300°F on a candy thermometer. This is the hard-ball stage, which is ideal for creating crystals.
Step 2: Add Color and Flavor
If you’d like to add color or flavor to your rock candy, now is the time to do so. A few drops of food coloring will give your crystals a vibrant hue, and a few drops of extract (like peppermint or lemon) will give them a delicious flavor. Stir well to incorporate the color and flavor into the solution.
Step 3: Prepare the Container
While the sugar solution is cooling slightly, prepare your container. Pour a small amount of the solution into the bottom of the glass jar to cover it. Suspend the wooden skewer, string, or stick in the center of the jar, using a pencil or chopstick to hold it in place. If you’re using a string, you can tie it to a paper clip to weight it down and keep it centered.
Step 4: Allow the Solution to Cool and Crystallize
Let the solution cool and settle in the jar. Cover the jar with a paper towel or coffee filter to keep dust out and allow it to sit undisturbed for several days. The longer you let it sit, the larger the crystals will grow.
Step 5: Enjoy Your Homemade Rock Candy
Once the crystals have grown to your desired size, remove the skewer or string from the jar and rinse the crystals gently with cold water to remove any excess sugar solution. Your rock candy is now ready to eat!
Tips and Variations
- Patience is Key: The crystallization process takes time, so don’t be tempted to disturb the jar or check on it too often. Let it sit undisturbed for the best results.
- Experiment with Colors and Flavors: Try different combinations of colors and flavors to create unique varieties of rock candy. For example, you could make red cherry rock candy, blue raspberry, or even sour apple.
- Add a Sparkle: To give your rock candy an extra sparkle, you can spray it with edible glitter before serving.
- Make It a Science Experiment: If you’re growing rock candy with kids, take the opportunity to explain the science behind crystallization. It’s a fun and educational activity that they’ll love.
The Chemistry of Crystallization
Crystallization is a fundamental concept in chemistry that occurs when molecules in a solution arrange themselves into a repeating pattern, forming a crystal lattice. In the case of rock candy, the sugar molecules in the supersaturated solution bond together to form crystals. This process can be influenced by several factors, including temperature, concentration, and the presence of nucleation sites.
A nucleation site is a surface on which crystals can form. In this experiment, the wooden skewer, string, or stick provides the nucleation site for the sugar crystals to grow on. Without a nucleation site, the solution might remain in a supersaturated state indefinitely.
The rate at which the crystals grow can also be influenced by the temperature and humidity of the environment. Higher humidity can slow down the crystallization process, as the solution will take longer to cool and settle. Conversely, lower humidity can speed up the process, allowing the crystals to form more quickly.
Serving and Storage
Once your rock candy is ready, you can enjoy it as a sweet treat or use it as a decorative element for cakes, cocktails, or other desserts. To store your rock candy, wrap it tightly in plastic wrap or place it in an airtight container to prevent it from attracting moisture and becoming sticky.
Conclusion
Growing rock candy is a fun and educational project that combines chemistry and confectionery. Whether you’re a science enthusiast, a DIY crafter, or just someone with a sweet tooth, this project is sure to delight. So gather your materials, set up your jar, and watch as the magic of crystallization creates a deliciously sweet treat right before your eyes. Happy-growing!