Have you ever gazed at the night sky and wondered what it would be like to launch your very own rocket? While building a full-scale spacecraft might be out of reach for most of us, the thrill of DIY rocketry is definitely within your grasp. With a little creativity, some basic materials, and a focus on safety, you can bring the power of rocket propulsion right into your backyard. Whether you’re a curious student, a hobbyist, or just someone who loves tinkering, this guide will walk you through the basics of testing DIY propulsion systems safely and effectively.
The Allure of DIY Rocketry
Rocketry has long been a source of fascination for people of all ages. From the iconic bottle rockets of childhood to the complex engineering marvels that reach for the stars, rockets represent the human spirit’s desire to explore and push boundaries. But why should rocketry be confined to laboratories and launchpads? With the rise of DIY culture and easily accessible materials, the backyard has become a viable testing ground for amateur rocket enthusiasts.
Safety First: The Foundation of DIY Rocketry
Before we delve into the specifics of building and testing your own propulsion systems, it’s crucial to emphasize the importance of safety. Rocketry, even at a small scale, involves combustion, pressurized containers, and rapid movements—elements that can be dangerous if not handled properly. A single mishap could result in injury, damage to property, or even legal consequences. Therefore, it’s essential to approach DIY rocketry with a mindset of caution and preparedness.
Understanding Local Laws and Regulations
Different regions have varying laws and regulations regarding amateur rocketry. Before you even begin gathering materials, it’s important to familiarize yourself with local ordinances. Some areas may require permits for launching certain types of rockets, while others may have restrictions based on size, altitude, or fuel type. Ignorance of the law is no excuse, so take the time to research and ensure that your project complies with all relevant regulations.
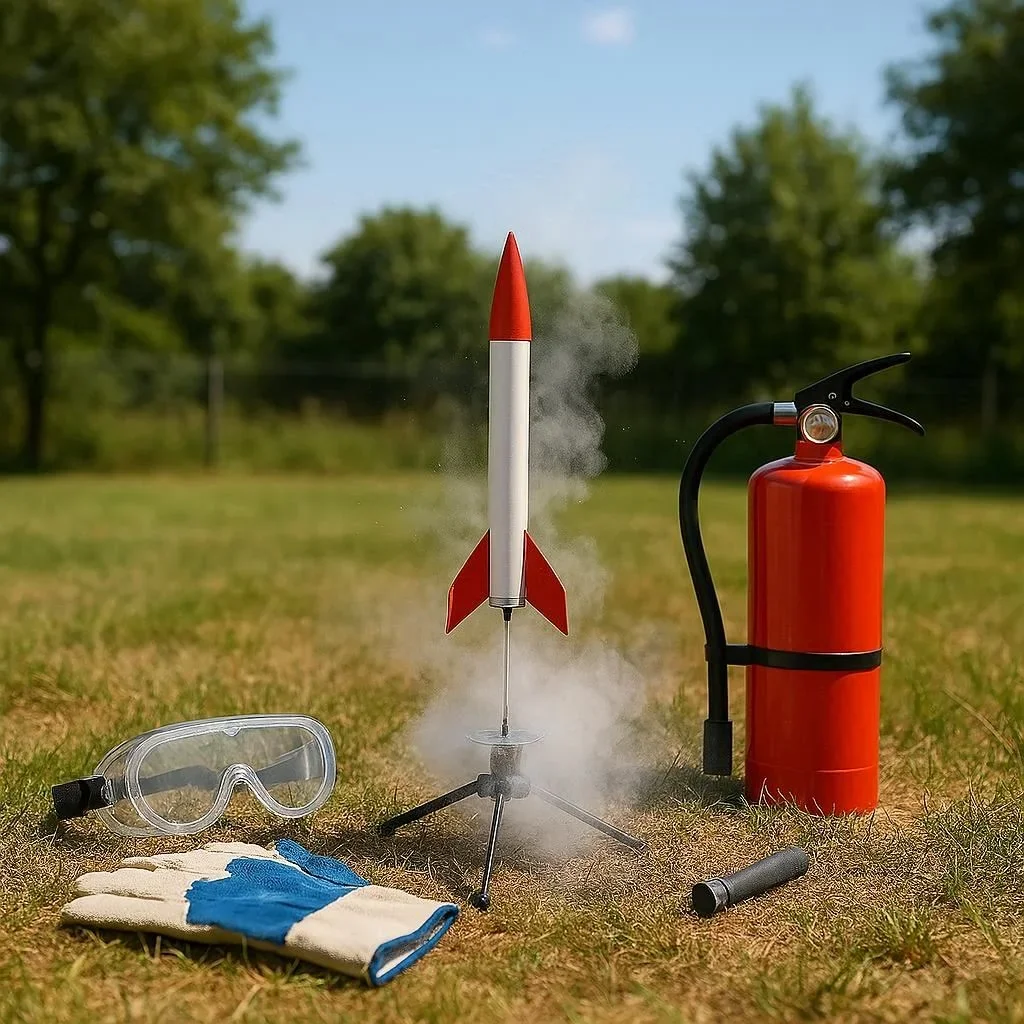
Protective Gear and Safety Measures
Even small-scale rockets can generate significant force and heat. To protect yourself and others, it’s crucial to use appropriate safety gear. This may include:
- Safety glasses or goggles: To protect your eyes from debris or accidental explosions.
- Heat-resistant gloves: To handle hot components and prevent burns.
- A fire extinguisher: To quickly address any unintended fires.
- A safe launch area: Choose a location that is far from flammable materials, power lines, and populated areas.
The Importance of Testing in Isolation
Before conducting any live tests, it’s wise to simulate your rocket’s performance using computer software or small-scale models. This allows you to identify potential issues and refine your design without risking injury or damage. There are numerous free and paid software options available online that can help you model your rocket’s trajectory, thrust, and other performance metrics.
Exploring Different Types of DIY Propulsion Systems
One of the most exciting aspects of DIY rocketry is the variety of propulsion systems you can experiment with. Each type has its own advantages and challenges, and the choice of which to pursue will depend on your skill level, resources, and goals.
1. Air-Powered Rockets
Air-powered rockets are one of the simplest and safest options for backyard experimentation. These rockets use compressed air as their propellant, which is both inexpensive and easy to handle. By combining air pressure with a sealed container and a quick-release mechanism, you can create a basic rocket that can reach impressive heights.
- How It Works: Air-powered rockets operate on the principle of rapid pressure release. As the compressed air is released, it generates thrust, propelling the rocket upward.
- Advantages: Safe, easy to build, and environmentally friendly.
- Challenges: Limited range and altitude compared to fuel-powered rockets.
2. Water-Powered Rockets
Water-powered rockets are another popular choice for amateur enthusiasts. Instead of compressed air, these rockets use water as their propellant, which is expelled under pressure to generate thrust.
- How It Works: As with air-powered rockets, water-powered rockets rely on the rapid expulsion of a fluid (in this case, water) to create thrust.
- Advantages: Easy to construct, environmentally friendly, and safe.
- Challenges: Heavier than air-powered rockets, and the water can make the rocket slippery to handle.
3. Solid-Fuel Rockets
Solid-fuel rockets represent a step up in complexity and power. These rockets use a solid propellant, such as a mixture of sugar and potassium nitrate, which is ignited to produce thrust.
- How It Works: The solid fuel is packed into a combustion chamber and ignited, producing a rapid burn that generates gases. These gases are expelled through a nozzle, creating thrust.
- Advantages: Longer range and higher altitude capabilities compared to air- and water-powered rockets.
- Challenges: More dangerous due to the use of combustible materials; requires more advanced safety precautions.
4. Liquid-Fuel Rockets
Liquid-fuel rockets are the most complex and powerful type of DIY propulsion system. These rockets use a combination of fuel and oxidizer, which are stored in separate tanks and combined in the combustion chamber to produce thrust.
- How It Works: The fuel and oxidizer are pumped into the combustion chamber, where they are mixed and ignited. The resulting gases are expelled through a nozzle, generating thrust.
- Advantages: High efficiency and control over thrust.
- Challenges: Highly dangerous due to the use of volatile liquids; requires advanced engineering and safety measures.
The Essential Tools and Materials
Before you can begin building your DIY propulsion system, you’ll need to gather the necessary tools and materials. The specific items you’ll need will depend on the type of rocket you’re building, but here are some common components:
- PVC pipe or similar materials: For constructing the rocket body and combustion chamber.
- Compressed air or water: For air- and water-powered rockets.
- Solid or liquid fuel: For fuel-powered rockets.
- Ignition source: Such as a spark plug or fuse.
- Safety gear: Including safety glasses, gloves, and a fire extinguisher.
- Wiring and electrical components: For more complex rocket designs.
- Launch pad: A stable platform for launching your rocket.
A Step-by-Step Guide to Building a Simple Rocket
Now that we’ve covered the basics, let’s walk through a simple step-by-step guide to building a basic air-powered rocket. This is a great project for beginners and can be completed with minimal tools and materials.
Step 1: Plan Your Design
Before you start building, it’s important to have a clear plan. Consider the following factors:
- Height and range: How high do you want your rocket to go? Keep in mind that higher altitudes may require more powerful propulsion.
- Stability: A stable rocket is less likely to veer off course or tumble during flight.
- Weight: Lighter materials will generally result in better performance.
- Safety: Always prioritize safety in your design.
Step 2: Gather Materials
Here’s what you’ll need for a basic air-powered rocket:
- 1 x PVC pipe (for the rocket body)
- 1 x PVC end cap (for the nose cone)
- 1 x PVC coupler (for the combustion chamber)
- 1 x bike tire valve (for pressurization)
- 1 x quick-release valve
- Water or air pump
- Safety glasses and gloves
Step 3: Assemble the Rocket Body
Using a saw or pipe cutter, cut the PVC pipe to your desired length. Attach the end cap to one end of the pipe to create the nose cone.
Step 4: Create the Combustion Chamber
Attach the PVC coupler to the open end of the rocket body. This will serve as the combustion chamber.
Step 5: Install the Pressurization System
Attach the bike tire valve to the combustion chamber. This will allow you to pressurize the system with air or water.
Step 6: Add the Quick-Release Mechanism
Install the quick-release valve at the base of the combustion chamber. This will allow the pressurized air or water to escape rapidly, generating thrust.
Step 7: Test the System
Before conducting a live test, pressurize the system slightly and observe for any leaks or weaknesses. If everything holds, you’re ready for the next step.
Step 8: Launch!
Find a safe, open area and set up your rocket on a stable launch pad. Pressurize the system to the desired level, stand back, and activate the quick-release valve. Watch as your rocket soars into the sky!
Common Challenges and How to Overcome Them
Building and testing DIY propulsion systems is not without its challenges. Here are some common issues you may encounter and how to address them:
- Leaks in the System:
- Cause: Poor seals or weak connections.
- Solution: Use high-quality materials and ensure all connections are secure.
- Inconsistent Performance:
- Cause: Variations in pressure or improper ignition.
- Solution: Experiment with different pressure levels and ignition sources.
- Stability Issues:
- Cause: Poor design or imbalance.
- Solution: Ensure the rocket is balanced and consider adding stabilizers.
- Safety Concerns:
- Cause: Lack of proper safety measures.
- Solution: Always wear protective gear, follow safety protocols, and test in a safe environment.
The Future of Backyard Rocketry
As technology advances and materials become more accessible, the possibilities for DIY rocketry continue to expand. Amateur rocket enthusiasts are constantly pushing the boundaries of what is possible, from developing more efficient propulsion systems to experimenting with advanced materials. Who knows? The next breakthrough in rocket technology could come from a backyard tinkerer like you.
Conclusion
Testing DIY propulsion systems in your backyard is not just a fun and educational hobby; it’s also a way to connect with a community of like-minded individuals who share your passion for exploration and innovation. With the right tools, materials, and mindset, you can bring the power of rocketry right into your own backyard. So why wait? Gather your materials, fire up your creativity, and let the countdown begin!
This blog post is for informational purposes only and should not be considered as professional advice. Always follow safety guidelines and local regulations when conducting DIY projects involving propulsion systems.