Ever wondered how to launch a balloon using nothing but water and a bit of ingenuity? A Water-Powered Balloon Launcher turns a simple bottle, a rubber band, and a splash of physics into a fun, educational project that can be built in minutes. Whether you’re a teacher looking for a hands‑on demonstration, a parent wanting to spark curiosity, or a hobbyist eager to experiment, this guide will walk you through the science, the steps, and the safety tips needed to create a reliable launcher that’s both safe and spectacular.
How the Water-Powered Balloon Launcher Works
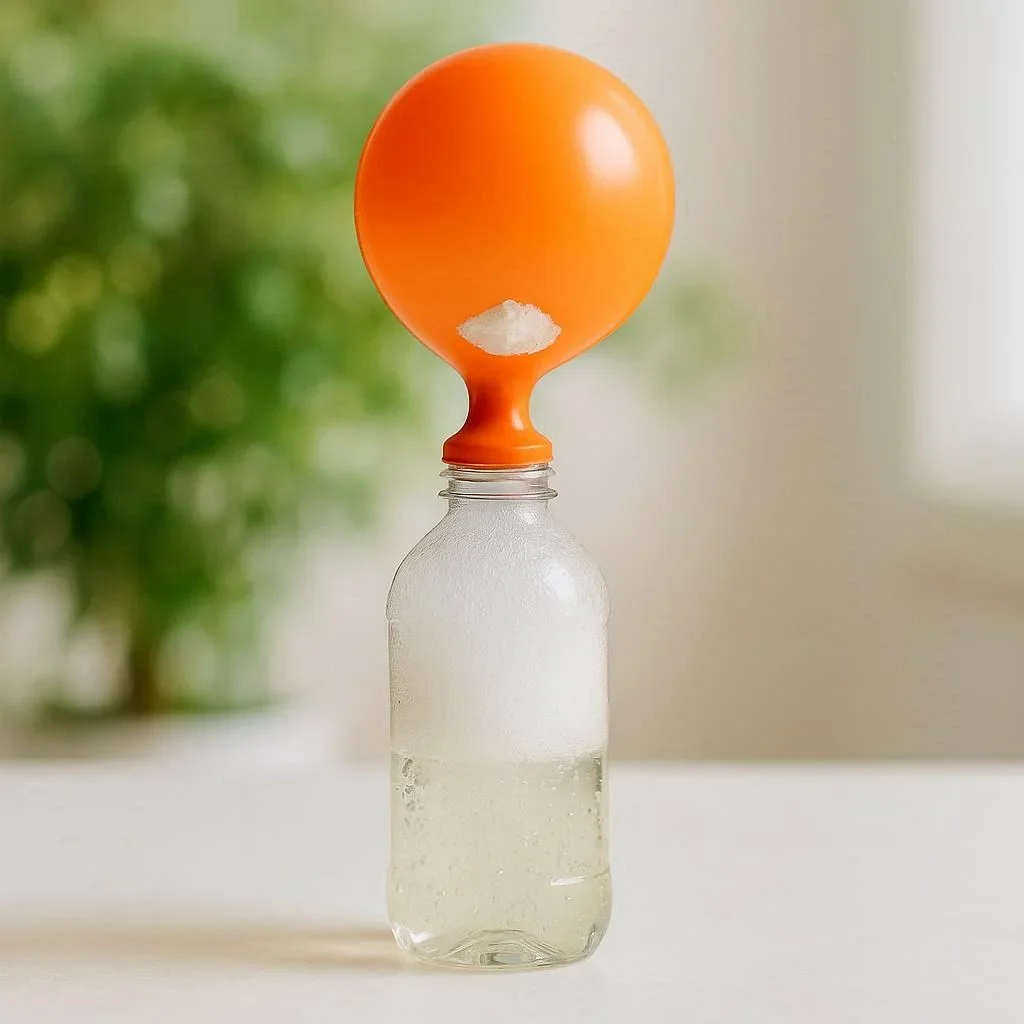
The core principle behind a Water-Powered Balloon Launcher is the conversion of potential energy stored in pressurized water into kinetic energy that propels the balloon. When you fill a bottle with water and seal it with a balloon, the water’s weight creates a pressure differential. By attaching a rubber band or a spring to the bottle’s neck, you store elastic potential energy. Releasing the band allows the water to rush out, pushing the balloon forward. This simple hydraulic system demonstrates key physics concepts such as pressure, force, and conservation of energy.
Materials and Safety Checklist
Before you start, gather the following items and review the safety checklist to ensure a smooth build:
- 1‑liter plastic bottle (clear for visibility)
- 1 large latex balloon (size 12–14 inches)
- 1 rubber band or small spring (for tension)
- Water (room temperature)
- Scissors or a sharp knife (for cutting the bottle neck)
- Safety goggles and gloves (recommended for all participants)
- Protective surface (e.g., a tarp or a plastic sheet)
Safety first: always wear goggles when cutting the bottle and keep the launcher away from children’s reach until it’s fully assembled. The water pressure can be surprisingly strong, so never aim the launcher at people or fragile objects.
Step‑by‑Step Assembly Instructions
Follow these steps to build a functional Water-Powered Balloon Launcher:
- Prepare the Bottle: Cut the bottle’s neck off with scissors or a knife, leaving a smooth, rounded edge. This will serve as the launch tube.
- Attach the Rubber Band: Loop the rubber band around the bottle’s neck and secure it to a fixed point, such as a sturdy table or a clamp. The band should be tight enough to hold the bottle but not so tight that it breaks.
- Fill with Water: Pour water into the bottle until it’s about three‑quarters full. The water’s weight will create the necessary pressure.
- Seal with Balloon: Stretch the balloon over the bottle’s opening, ensuring a snug fit. The balloon will act as a flexible piston, allowing water to escape while maintaining pressure.
- Test the Launcher: Pull the rubber band back to build tension, then release it. The water rushes out, pushing the balloon forward. Adjust the tension or water volume to fine‑tune the launch distance.
For a more advanced version, replace the rubber band with a small spring or a pneumatic cylinder to increase the launch force. Always test in a controlled environment to avoid accidental injuries.
Exploring the Physics Behind the Launch
Understanding the science can enhance the learning experience. The launcher operates on the principle of hydraulic pressure and elastic potential energy. When the rubber band is pulled, it stores energy proportional to the square of the displacement (Hooke’s Law). Releasing the band converts this energy into kinetic energy, propelling the water out of the bottle. The escaping water exerts a force on the balloon, accelerating it forward. This is a practical demonstration of Newton’s Third Law: for every action, there is an equal and opposite reaction.
To deepen the exploration, you can measure the launch distance at different water volumes or rubber band tensions and plot the results. This data can be compared to theoretical predictions from fluid dynamics and mechanics, providing a hands‑on way to validate equations from physics textbooks.
Applications and Variations for Learning
A Water-Powered Balloon Launcher is more than a toy; it’s a versatile teaching tool. Here are a few ways to extend its educational value:
- Engineering Challenges: Have students design a launcher that can shoot a balloon the farthest distance using limited materials.
- Environmental Science: Discuss the role of water pressure in natural systems, such as geysers or hydraulic fracturing.
- Mathematics Integration: Use the launcher to calculate velocity, acceleration, and projectile motion equations.
- Art and Design: Encourage students to decorate their launchers, blending creativity with science.
These activities can be adapted for different age groups, making the launcher a flexible resource for classrooms, after‑school clubs, or family science nights.
Resources for Further Exploration
To expand your knowledge and keep your projects grounded in reliable science, consult these authoritative sources:
- Balloon – Wikipedia’s overview of balloon physics and materials.
- NASA – Insights into fluid dynamics and propulsion used in space missions.
- American Chemical Society – Articles on pressure and force in everyday systems.
- Smithsonian Institution – Educational exhibits on physics and engineering.
- National Geographic – Features on natural hydraulic phenomena.
Conclusion: Build, Learn, and Launch! The Water-Powered Balloon Launcher is a simple yet powerful way to bring physics to life. By combining everyday materials with fundamental principles, you create a hands‑on experience that sparks curiosity and reinforces STEM concepts. Whether you’re a teacher, parent, or hobbyist, this project offers endless opportunities for experimentation, learning, and fun. Try building your own today and watch science take flight!
Frequently Asked Questions
Q1. What materials do I need to build a Water‑Powered Balloon Launcher?
You’ll need a 1‑liter clear plastic bottle, a large latex balloon (12–14 inches), a rubber band or small spring, water, scissors or a sharp knife, safety goggles, gloves, and a protective surface like a tarp. These items are inexpensive and easy to find at most grocery or hardware stores.
Q2. How does the launcher actually work?
The bottle’s neck acts as a tube, and the rubber band stores elastic potential energy when pulled. When the band is released, the pressurized water rushes out, pushing the balloon forward. This conversion of stored energy into kinetic energy demonstrates basic principles of hydraulics and Newton’s Third Law.
Q3. Is this project safe for children to try?
Yes, if proper safety precautions are followed. Always wear goggles when cutting the bottle, keep the launcher away from children’s reach until assembled, and never aim the launcher at people or fragile objects. Supervision by an adult is recommended for younger participants.
Q4. How can I increase the launch distance of the balloon?
Try using a stronger rubber band or a small spring to store more elastic energy. Increase the water volume to raise the pressure, but avoid overfilling. Adjust the angle of the bottle and experiment with different balloon sizes for optimal performance.
Q5. What variations can I explore to make the project more interesting?
You can replace the rubber band with a pneumatic cylinder, add a steering mechanism, or design a multi‑stage launcher. Incorporating sensors to measure launch velocity or using colored water for visual effects are also fun extensions. These variations provide deeper learning opportunities in engineering and physics.